The Kammok Mantis is a lightweight and highly modular hammock tent system that combines excellent comfort, easy setup, and durable materials for backpacking adventures below the tree line. Its adaptable design and integrated suspension system make it especially appealing for backpackers transitioning from traditional tents to hammock tents.

Kammok Mantis Hammock Tent Review
Several months ago, we got in touch with the American outdoor brand Kammok. Kammok produces various pieces of backpacking sleeping gear but is especially known for their top-notch hammocks and hammock sleeping set-ups. They asked us if we could test their Mantis hammock tent in return for an unbiased review. I checked the product on their website and was immediately fascinated over it. The Kammok Mantis hammock tent is basically a hammock with a detachable bug net and a rainfly. It comes with straps so you can easily hang it between two tress and features a knotless setup. With the hammock tent we also got the Kammok Firebelly quilt (in-detail review will come later) which can be used as a hammock underquilt at low temperatures.
The main advantage of the Kammok Mantis hammock tent is its modularity and relatively low weight. It weighs 1250 grams (2 lbs. 12 oz.) with the bug net, fly, straps and stakes. However, due to its modularity you can easily reduce its weight by leaving unnecessary parts at home (for example bug net, fly etc.). In the last couple of months, I spent several nights in the Mantis hammock tent and below is what I learned about it.
The Kammok Mantis Hammock Tent is suitable for:
- Backpacking
- Camping
- Hiking
- Mountaineering (below the tree line)
The concept
The Kammok Mantis is my first hammock tent and when I first unwrapped it from the integrated stuff sack, I was a bit confused about what is what. Nevertheless, the whole concept is really simple, and I figured out how it works in less than three minutes. So, in the stuff sack you will find the rainfly with 8 cords, a pair of Python straps for attaching the hammock and the hammock itself with the (detachable) bug net. It is very convenient that the stuff sack is integrated into the hammock because stuff sacks are easy to lose. The four stakes are securely attached in pockets on the side of the stuff sack.
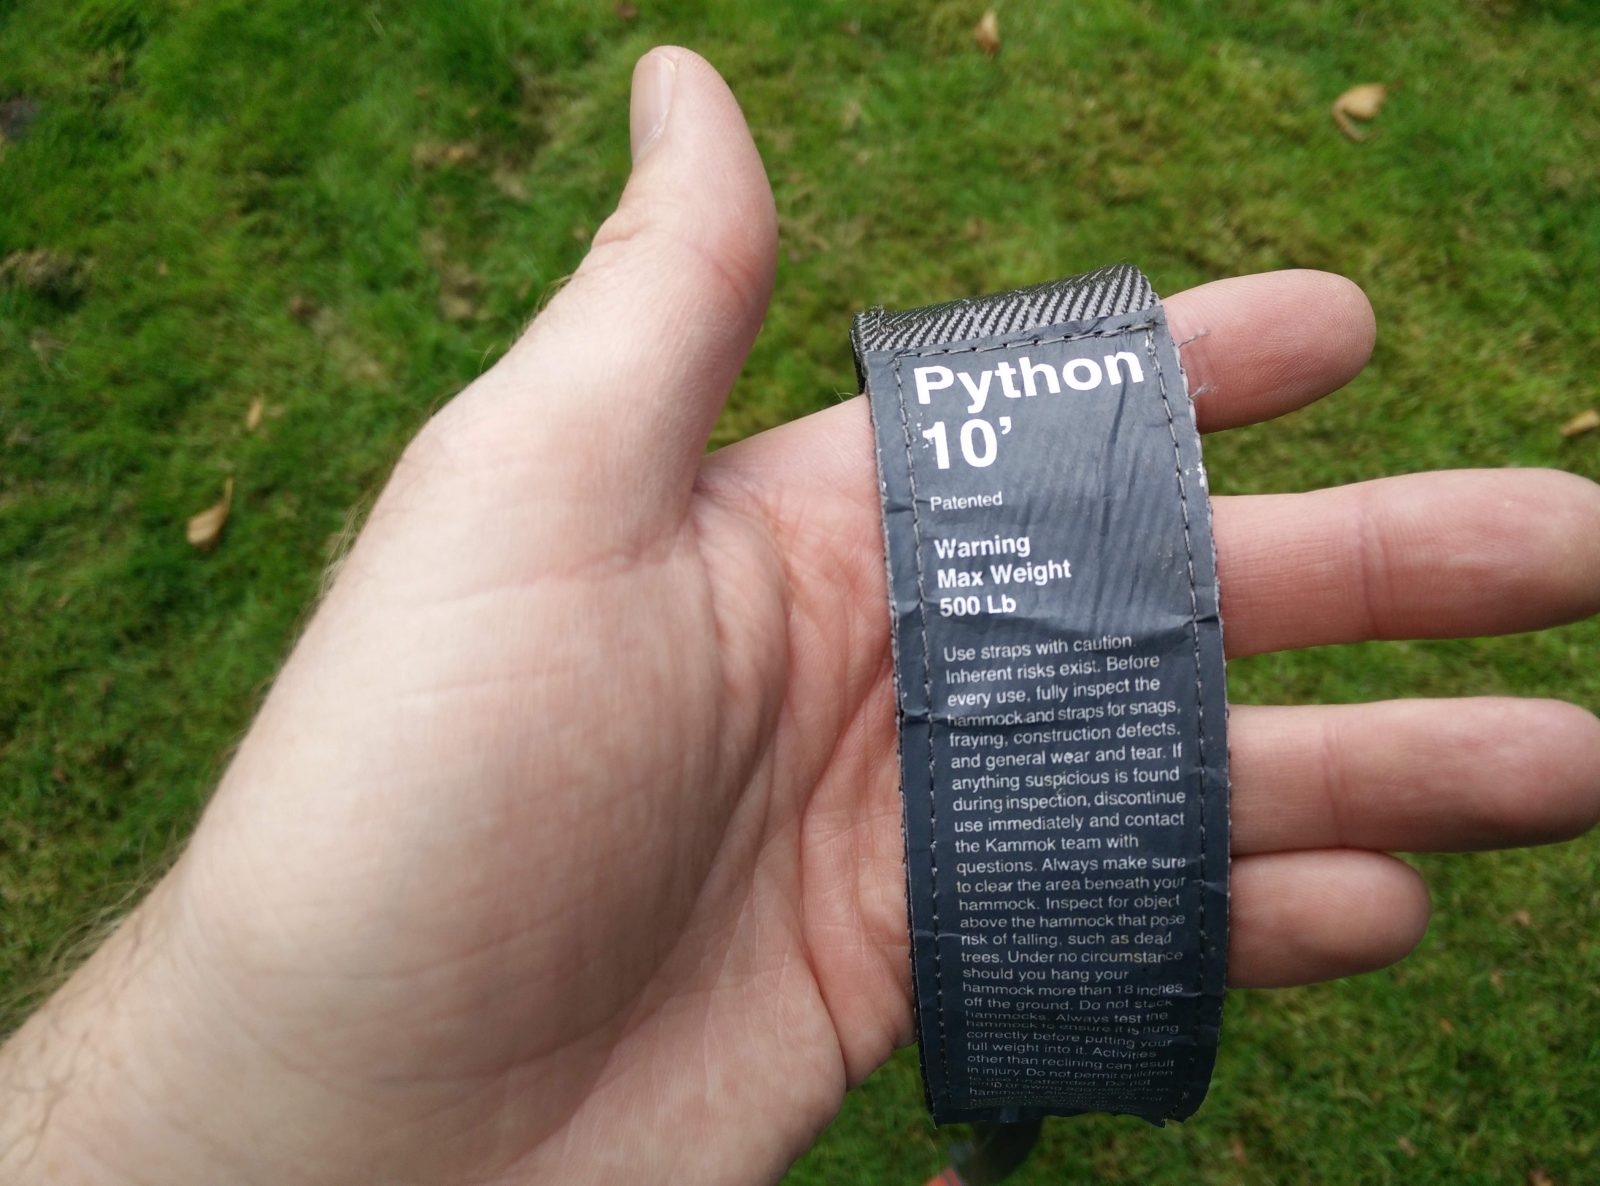
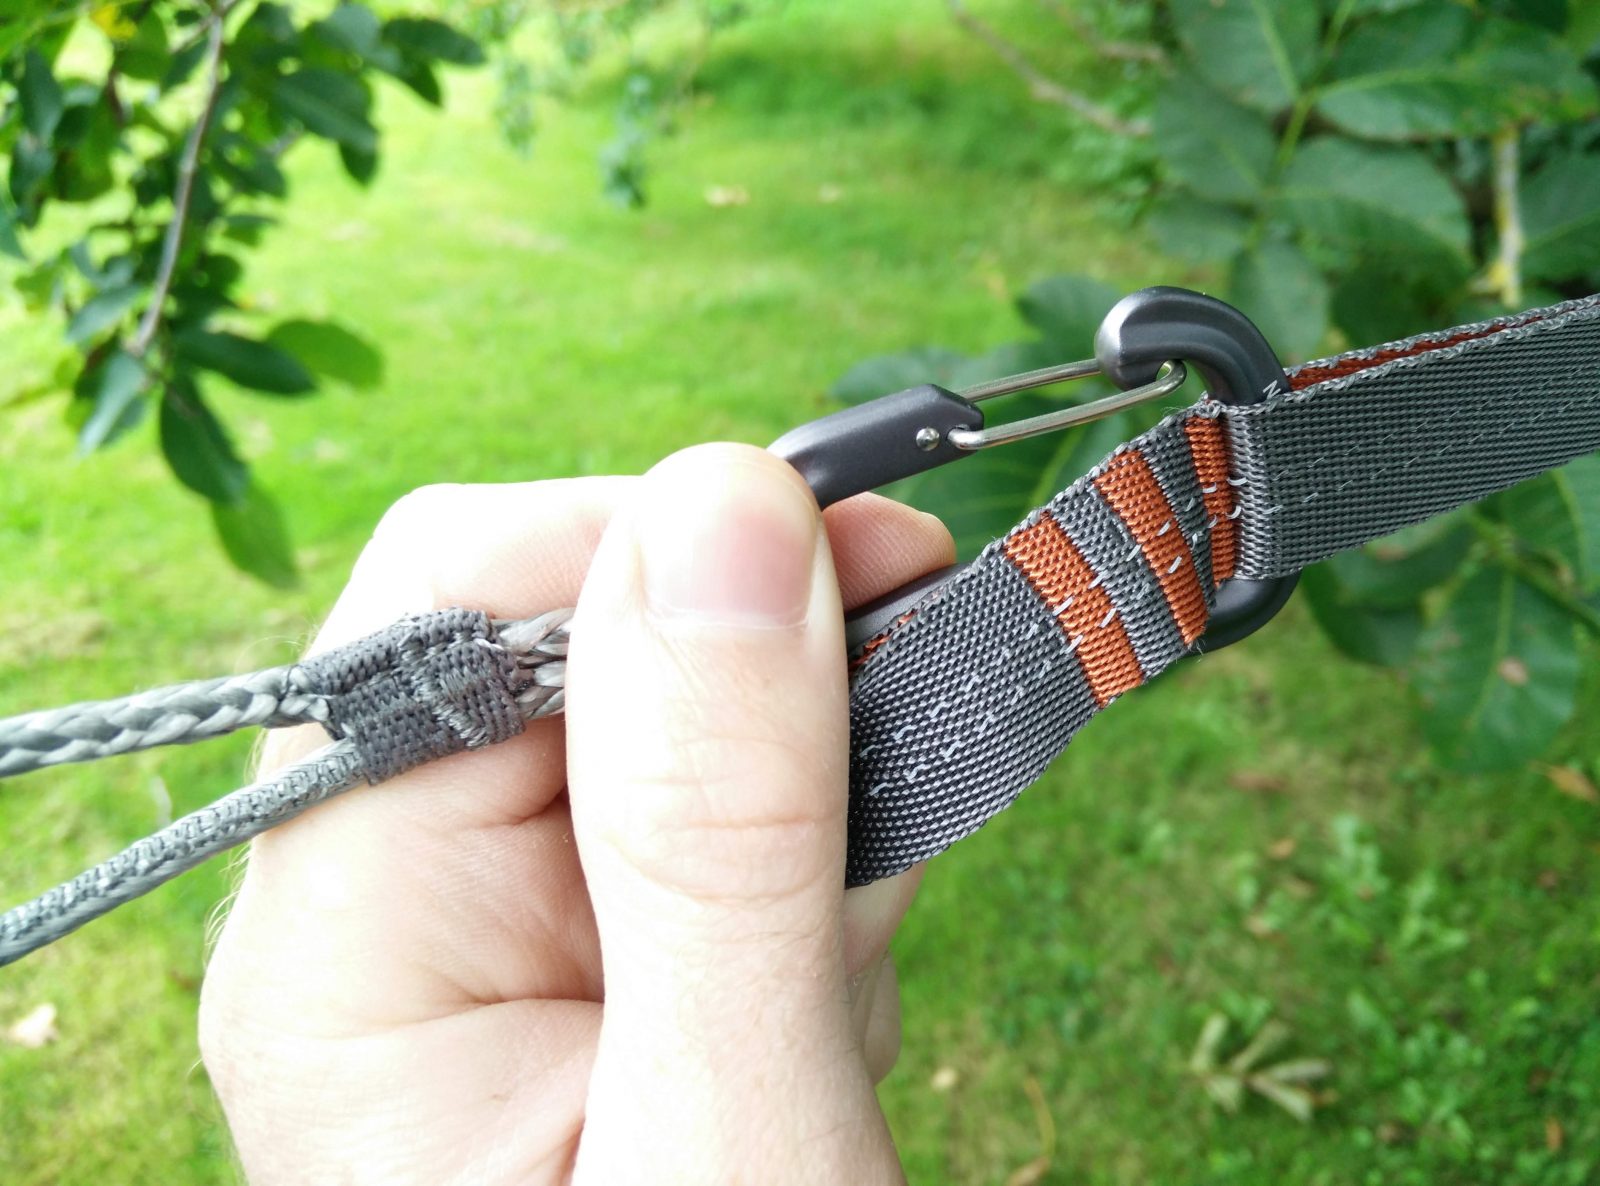
The Python straps enable you to hang the hammock by being secured around tree trunks. Each strap is 3 meters (10 ft.) long and has 20 connection points. These connection points allow you to easily elevate or lower the hammock, which you clip into the straps using the hammock’s attached carabiners. The bug net is attached to the hammock with zippers but can be also removed. Otherwise, the lower four zippers on the bug net enable you to get in and out of the hammock tent.
The rain fly comes over the hammock and protects you against the rain, wind and morning dew. It has altogether eight cords. The two main cords, one in each end of the rain fly, should be attached to the same tree trunks as the hammock itself, but higher, while the six cords on the longer sides should be attached to the stakes to secure the position of the rain fly in case of wind etc.
So, in the stuff sack you basically get a complete backpacking sleeping setup. There is no need for a sleeping pad as you anyway won’t sleep on the (cold) ground. The setup is also very modular. You can decide what to bring on the trail and what to leave at home. For example, if you are backpacking in a mosquito free area there is no need to bring the bug net, which then reduces the weight of the setup for around 150 grams.
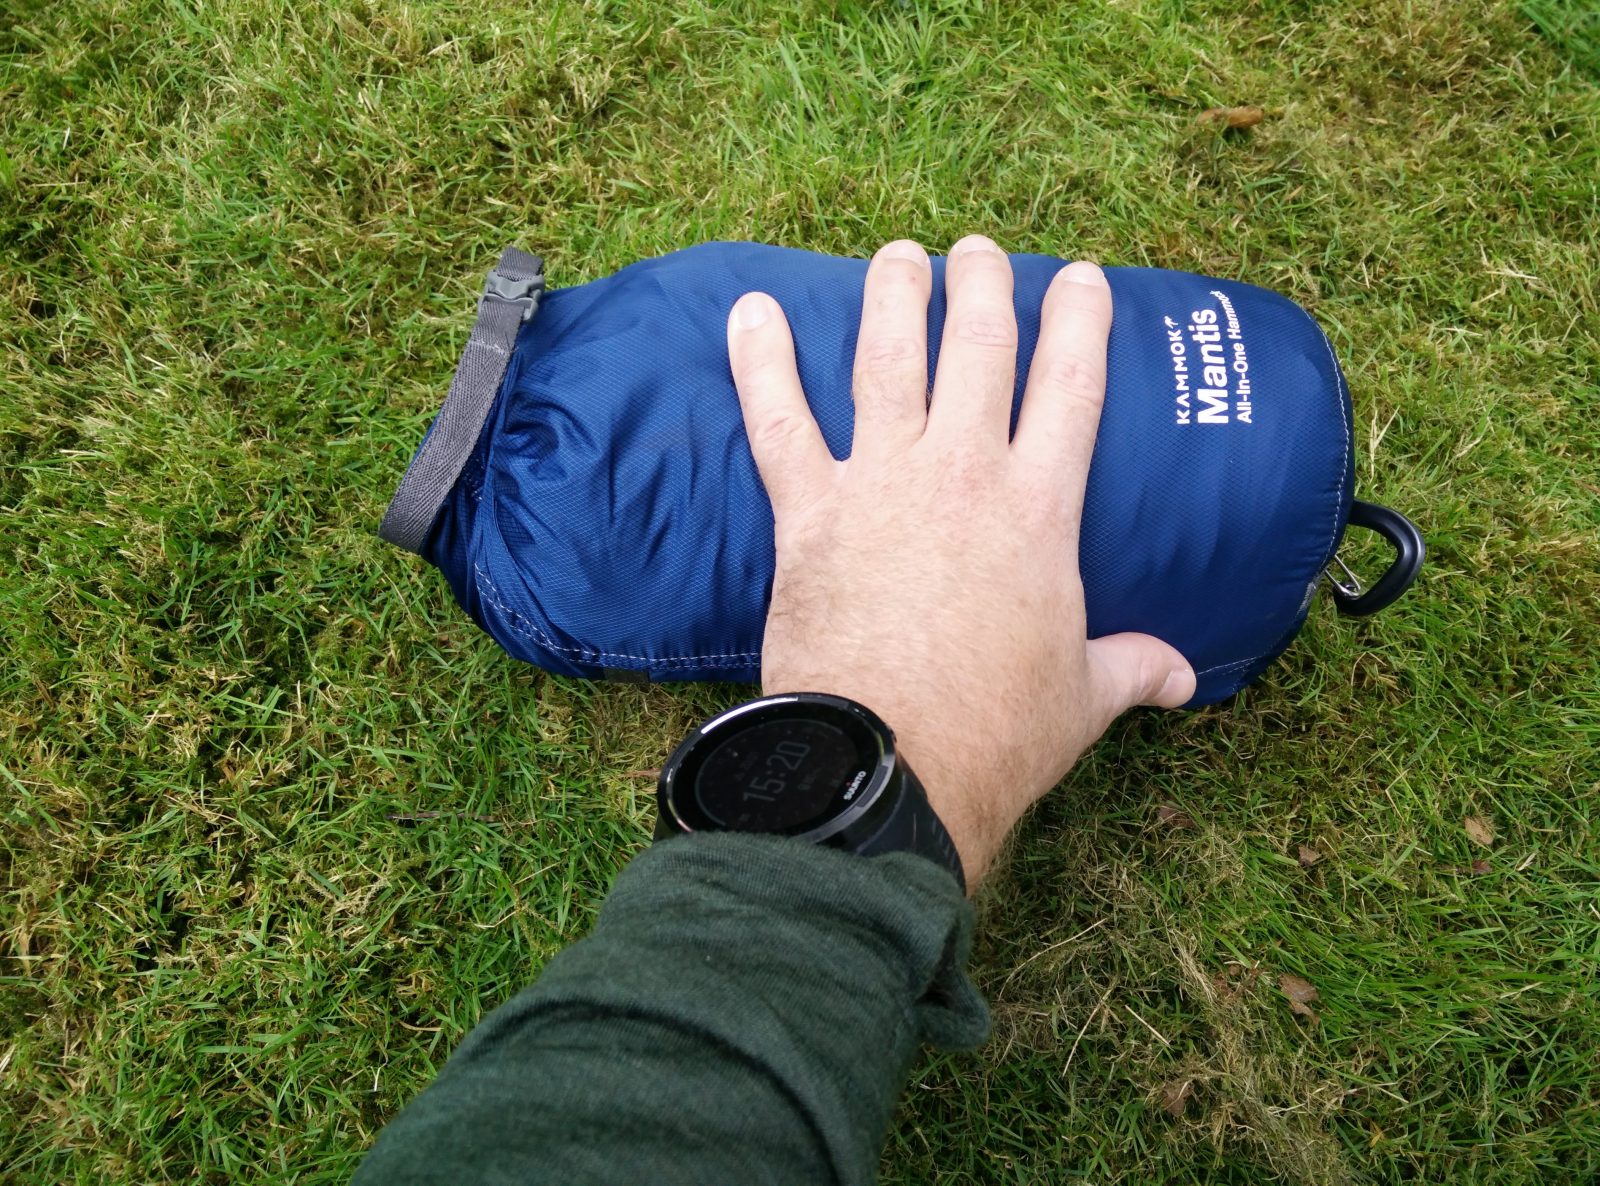
Kammok Mantis Hammock Tent – The Stuff sack
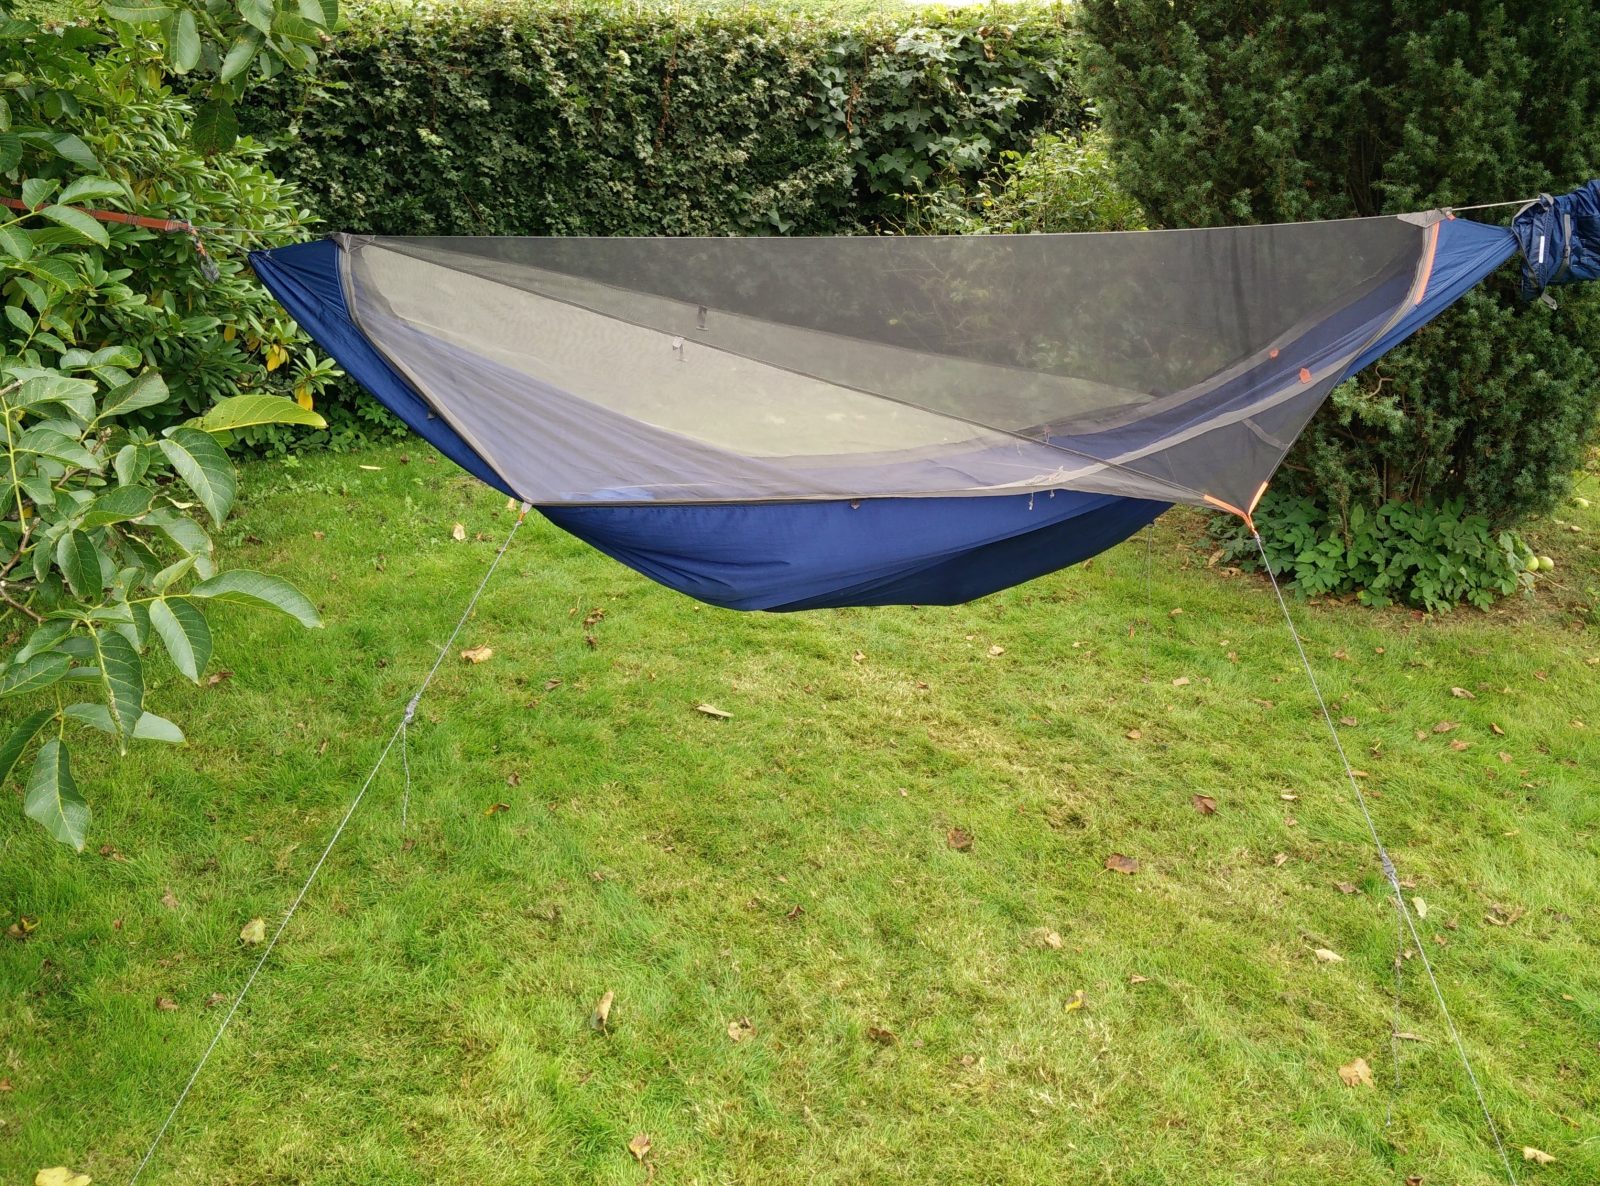
Kammok Mantis Hammock Tent – Hanging without the rainfly
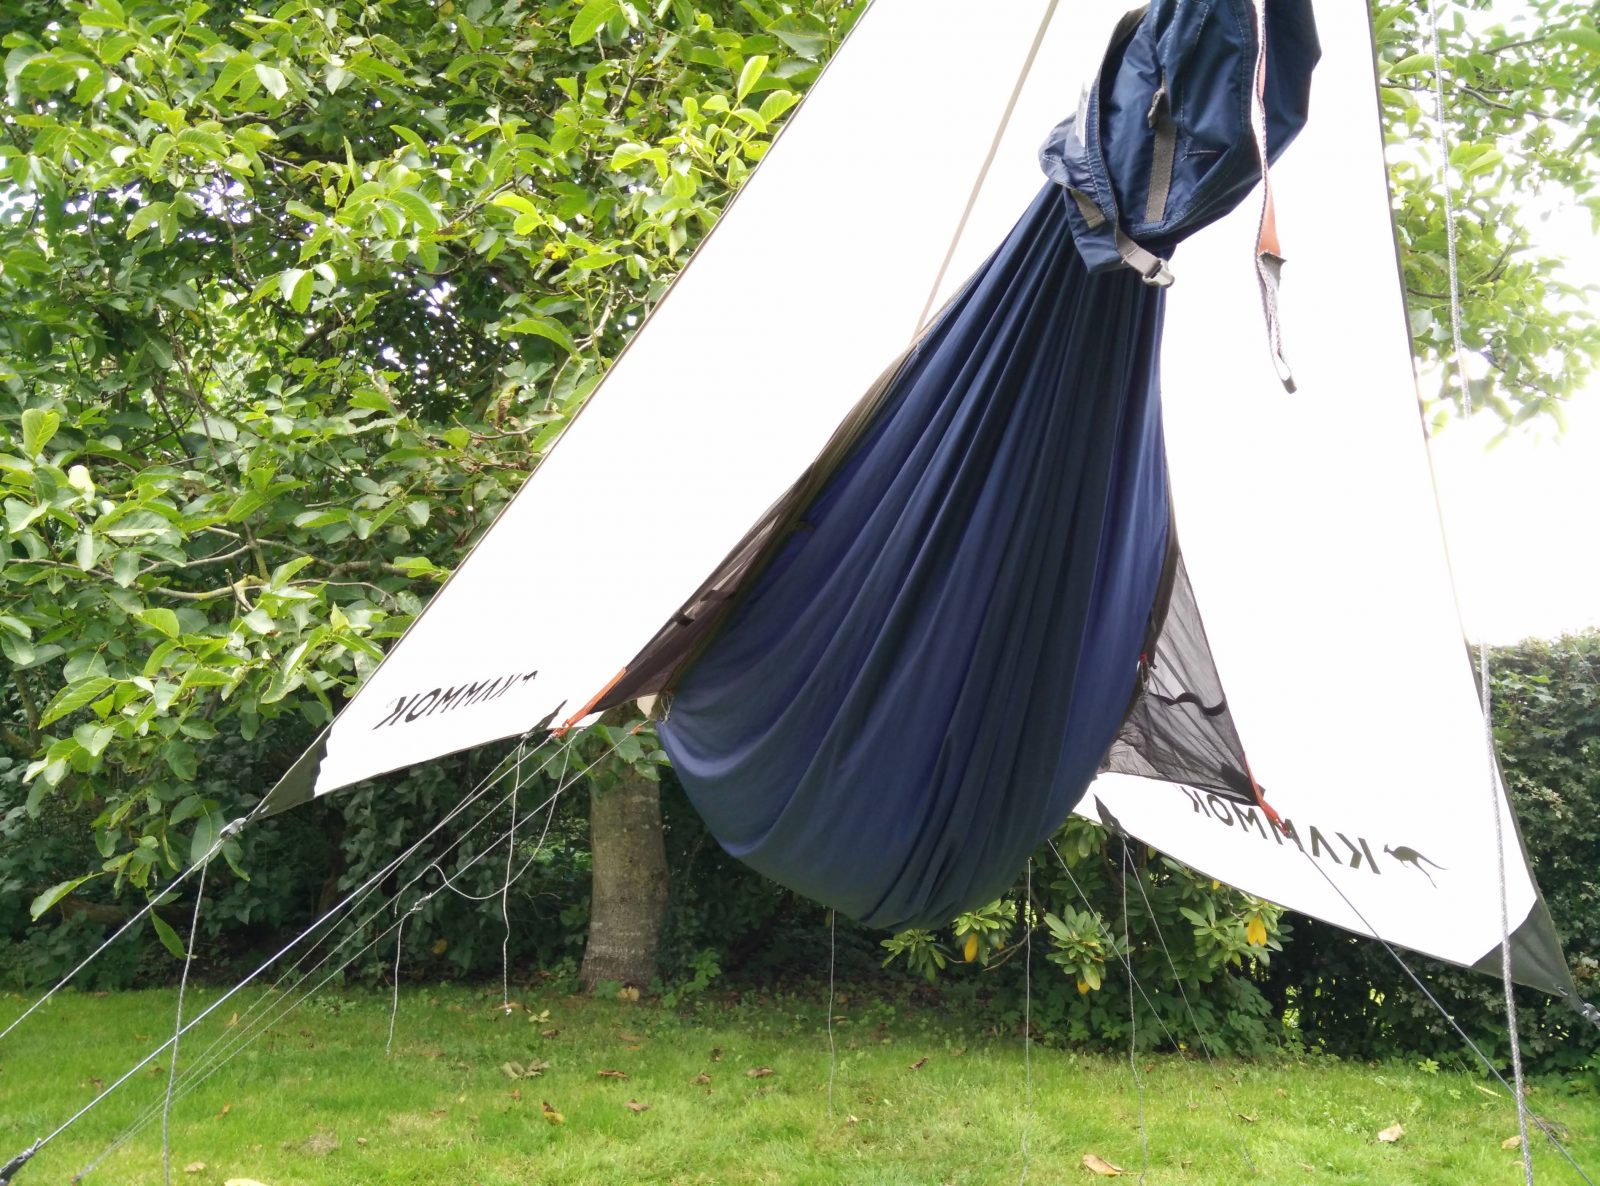
Kammok Mantis Hammock Tent – The complete setup
Materials
After I had put all the items from the stuff sack on the ground, I thoroughly investigated them. I must say that I was positively surprised over the quality. Everything is super lightweight, yet sturdy and robust. The only thing that I was a bit worried about was the hammock itself. It is made of a very thin material and I wasn’t sure if it will hold my 82 kg (180 lbs) of weight. Nevertheless, my worries proved unnecessary. The hammock indeed withstood my weight without a problem and according to Kammok it has a weight limit of no less than 225 kg (500 lbs).
The hammock is made of 40-denier nylon and treated with DWR so that it repels the water. The Python straps are very robust and according to Kammok they can carry the same weight as the hammock (225 kg). The two carabiners on the hammock, which connect it to the Python straps, are easy to handle and lightweight. The bug net also seems durable and is in black color for undisturbed star gazing. The rain fly weighs merely 321 grams (11.3 oz.) and is made of 15-denier nylon with silicone coating for good rain resistance. All in all, I have zero complaints over the materials.
Kammok Mantis Hammock Tent – Lightweight canopy and sturdy cords
Kammok Mantis Hammock Tent – Strong Python straps
The set-up process
So, before I started the whole set-up process for the first time, I watched this video from Kammok which explains the nitty-gritty of hanging the Mantis hammock tent. Kammok recommends first setting up the rain fly but I eventually figured out that it’s much easier if you first hang the hammock. Why? Because chances are that you’ll hang it too low or too high and it will be a hassle to readjust it if you already have hung the rainfly over it. You’ll basically have to readjust everything. Therefore, I recommend the following set-up process.
Step 1: Hang the hammock
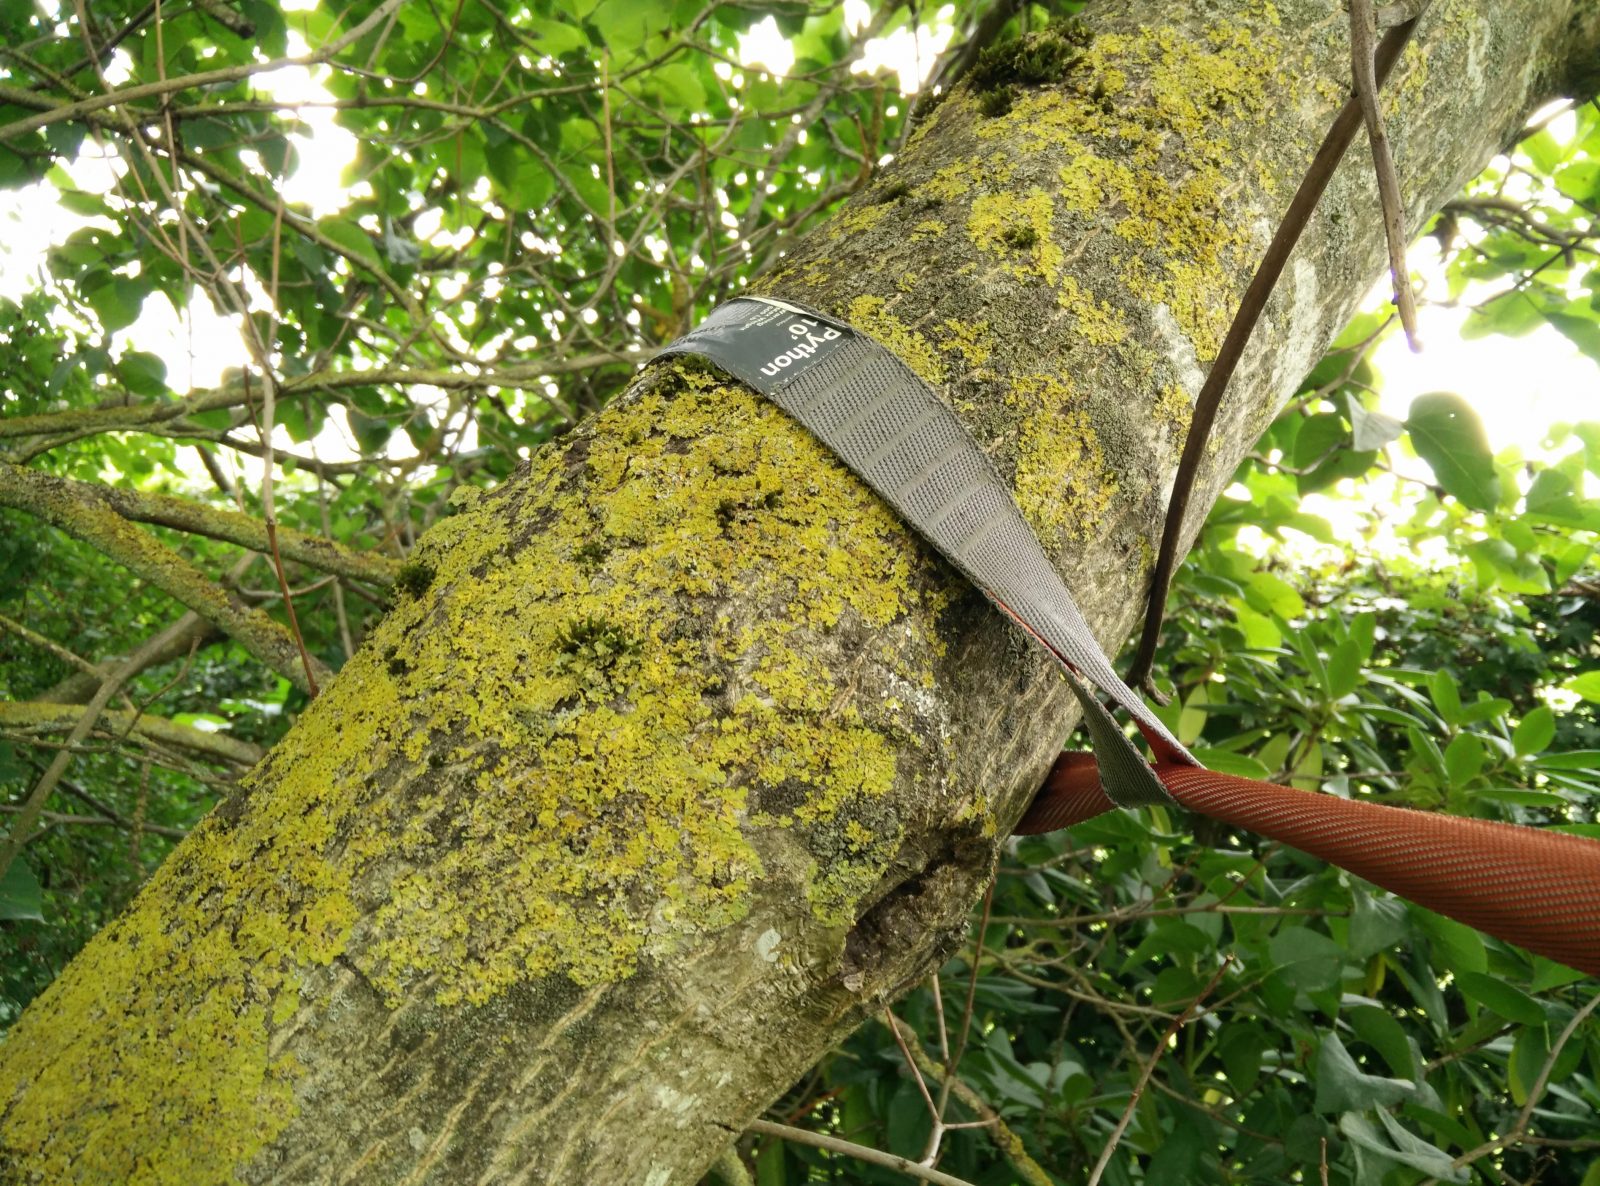
Find two trees which are 4 to 5.5 meters (13 – 18 ft.) apart and secure each Python strap around a tree. There is a single loop on the wider end of the Python strap, and you should put the narrow end of the strap through this loop to secure it, so the wider end is what it wrapped around the tree trunk (see images).
With my weight and preferred distance between the trees I soon figured out that the Python straps should be secured at least two meters above the ground for positioning the hammock adequately high. When you have secured the Python straps, clip the carabiners on the hammock to the loops on the straps. Each Python strap has 20 loops which further allows you to adjust how high above the ground the hammock hangs. In my experience the cord on top of the bug net should be approximately 170 centimeters (67 in.) above the ground – which amounts to the height of my chin. If the cord on top of the bug net is lower, the hammock will hang too close to the ground and if it’s higher, you’ll have trouble getting in.
Once you hung the hammock, sit in it, bounce a little and check that the height fits – i.e. that your butt is adequately above the ground. Readjust if necessary.
Note: The 4 to 5.5 meters (13 – 18 ft.) distance is recommended by Kammok. I also managed to hang the hammock between trees that were 7 meters apart (22 ft.).
Step 2: Set up the rainfly
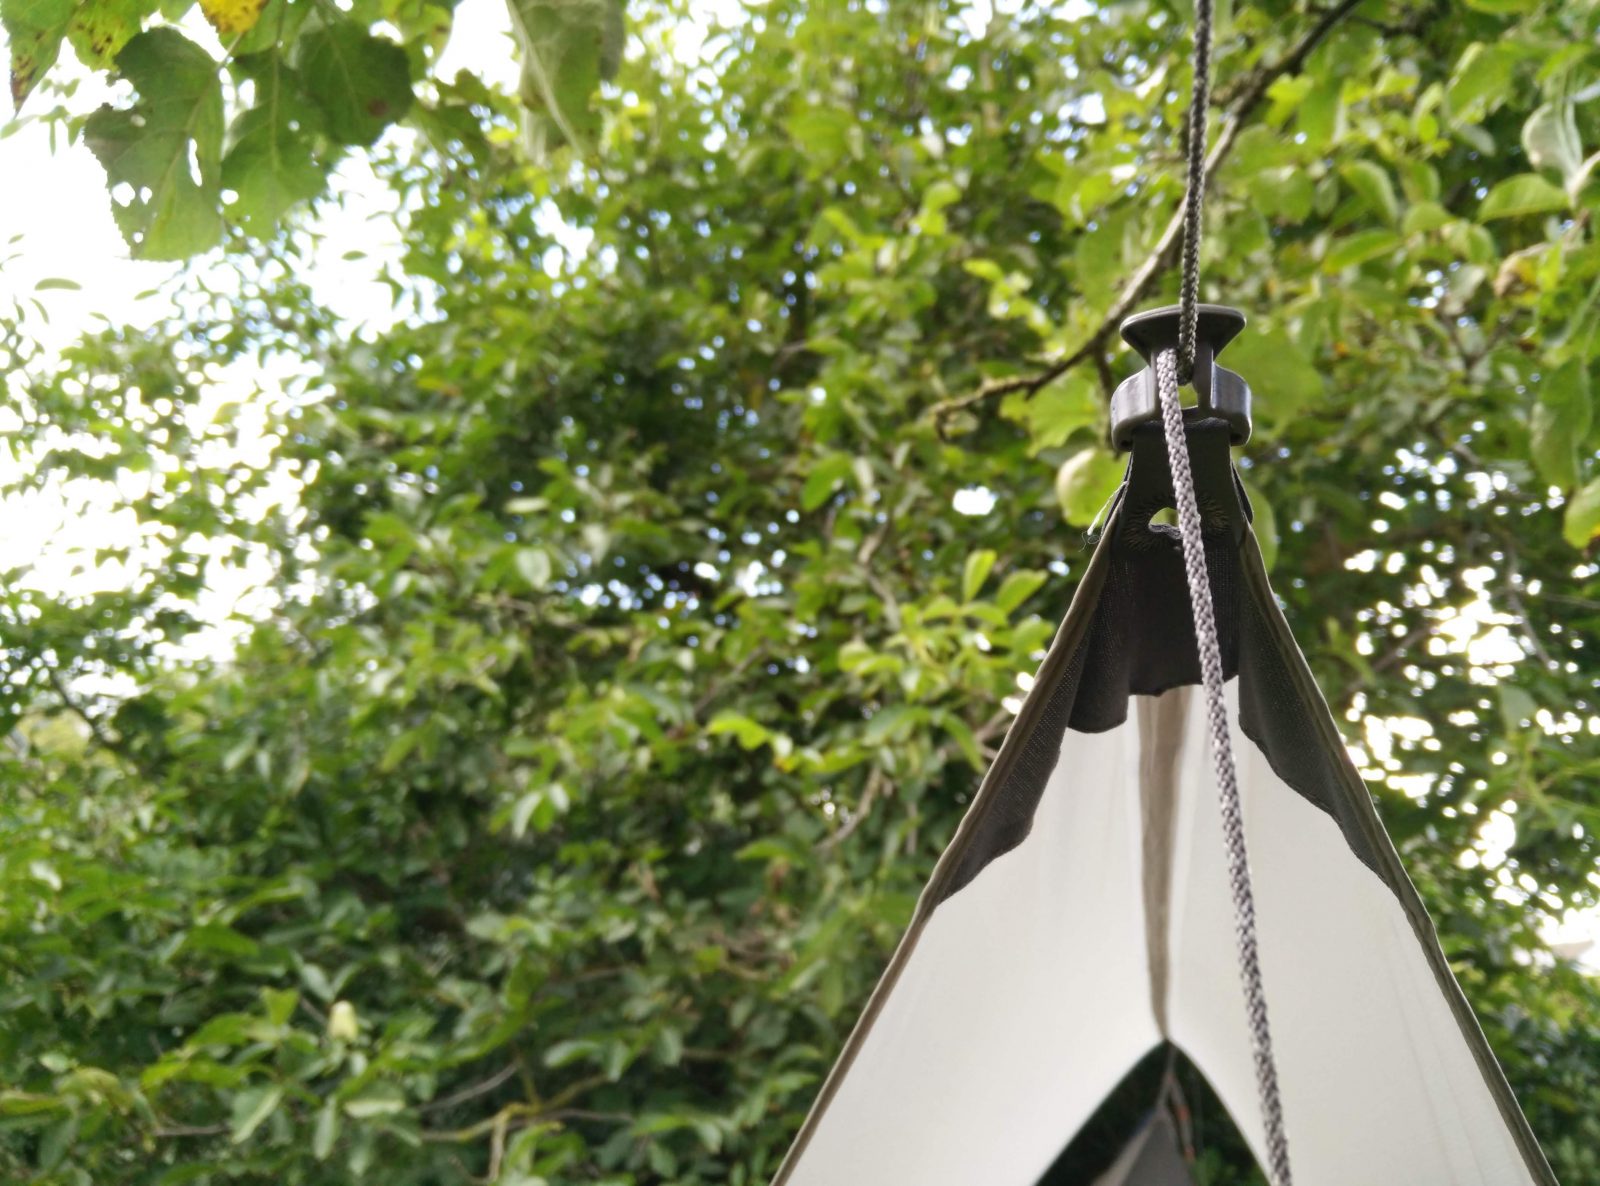
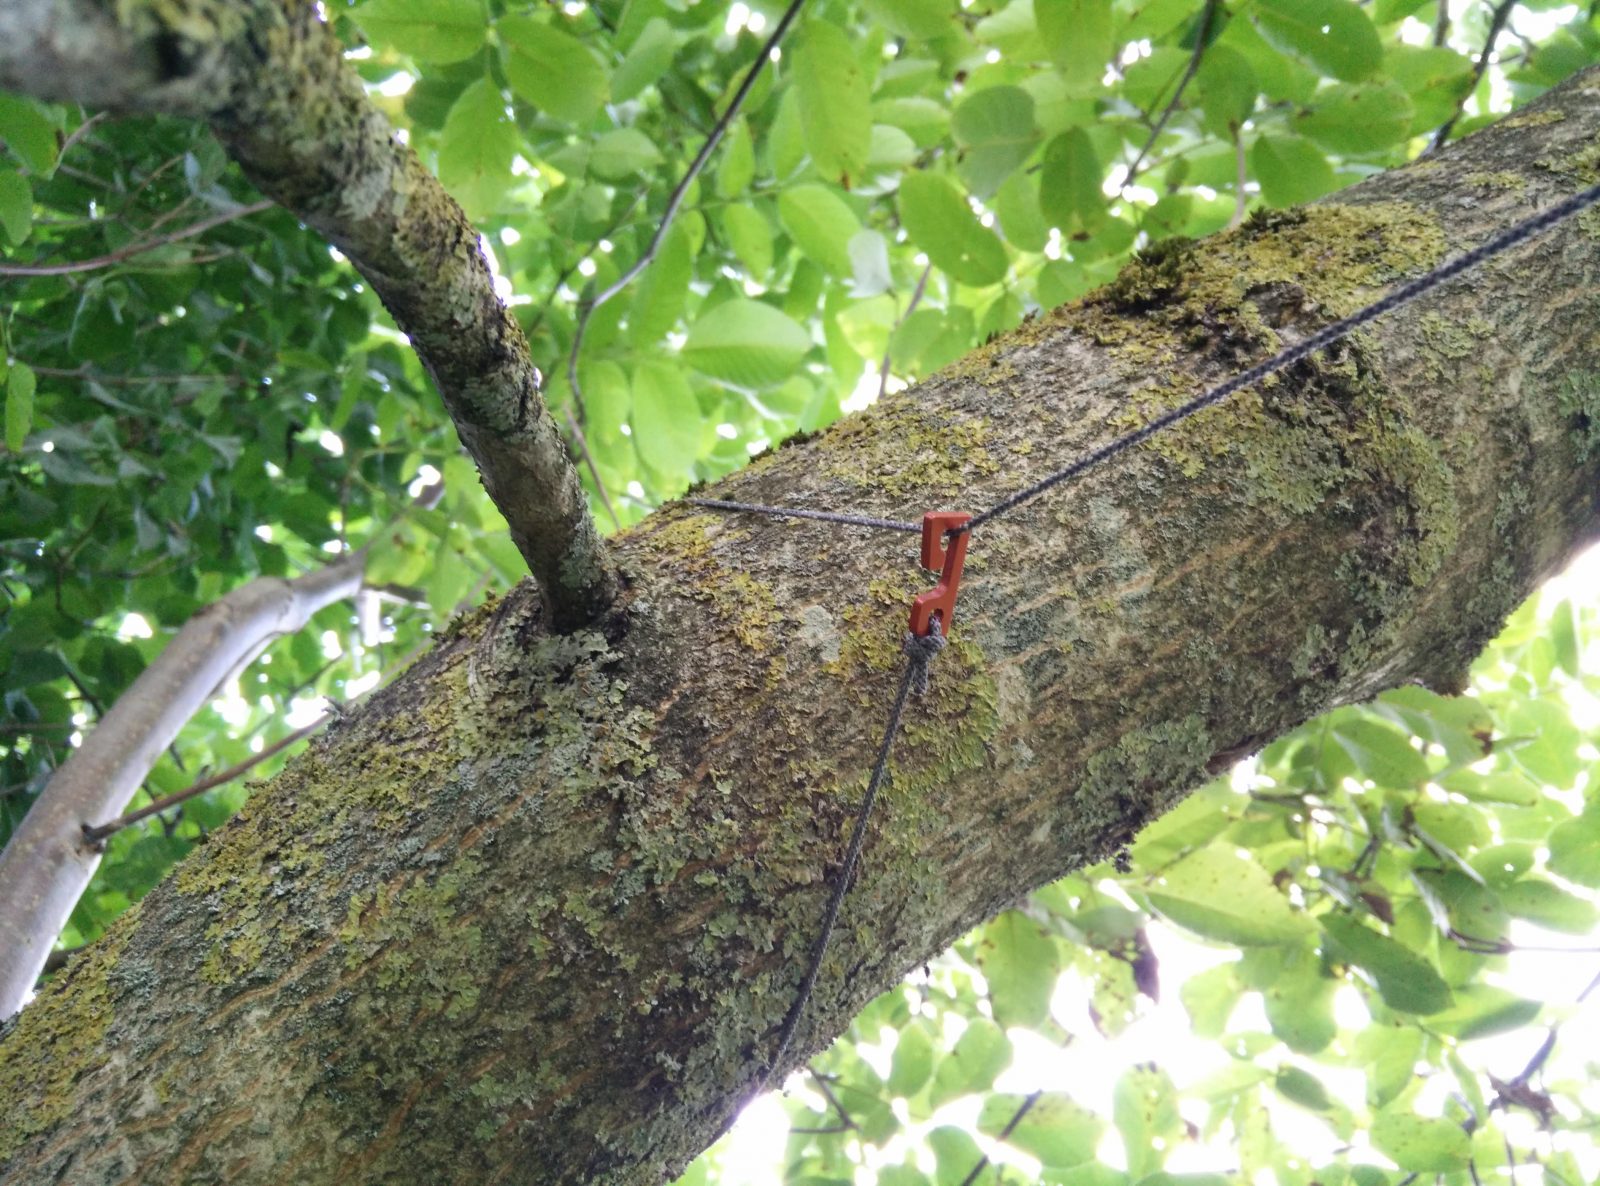
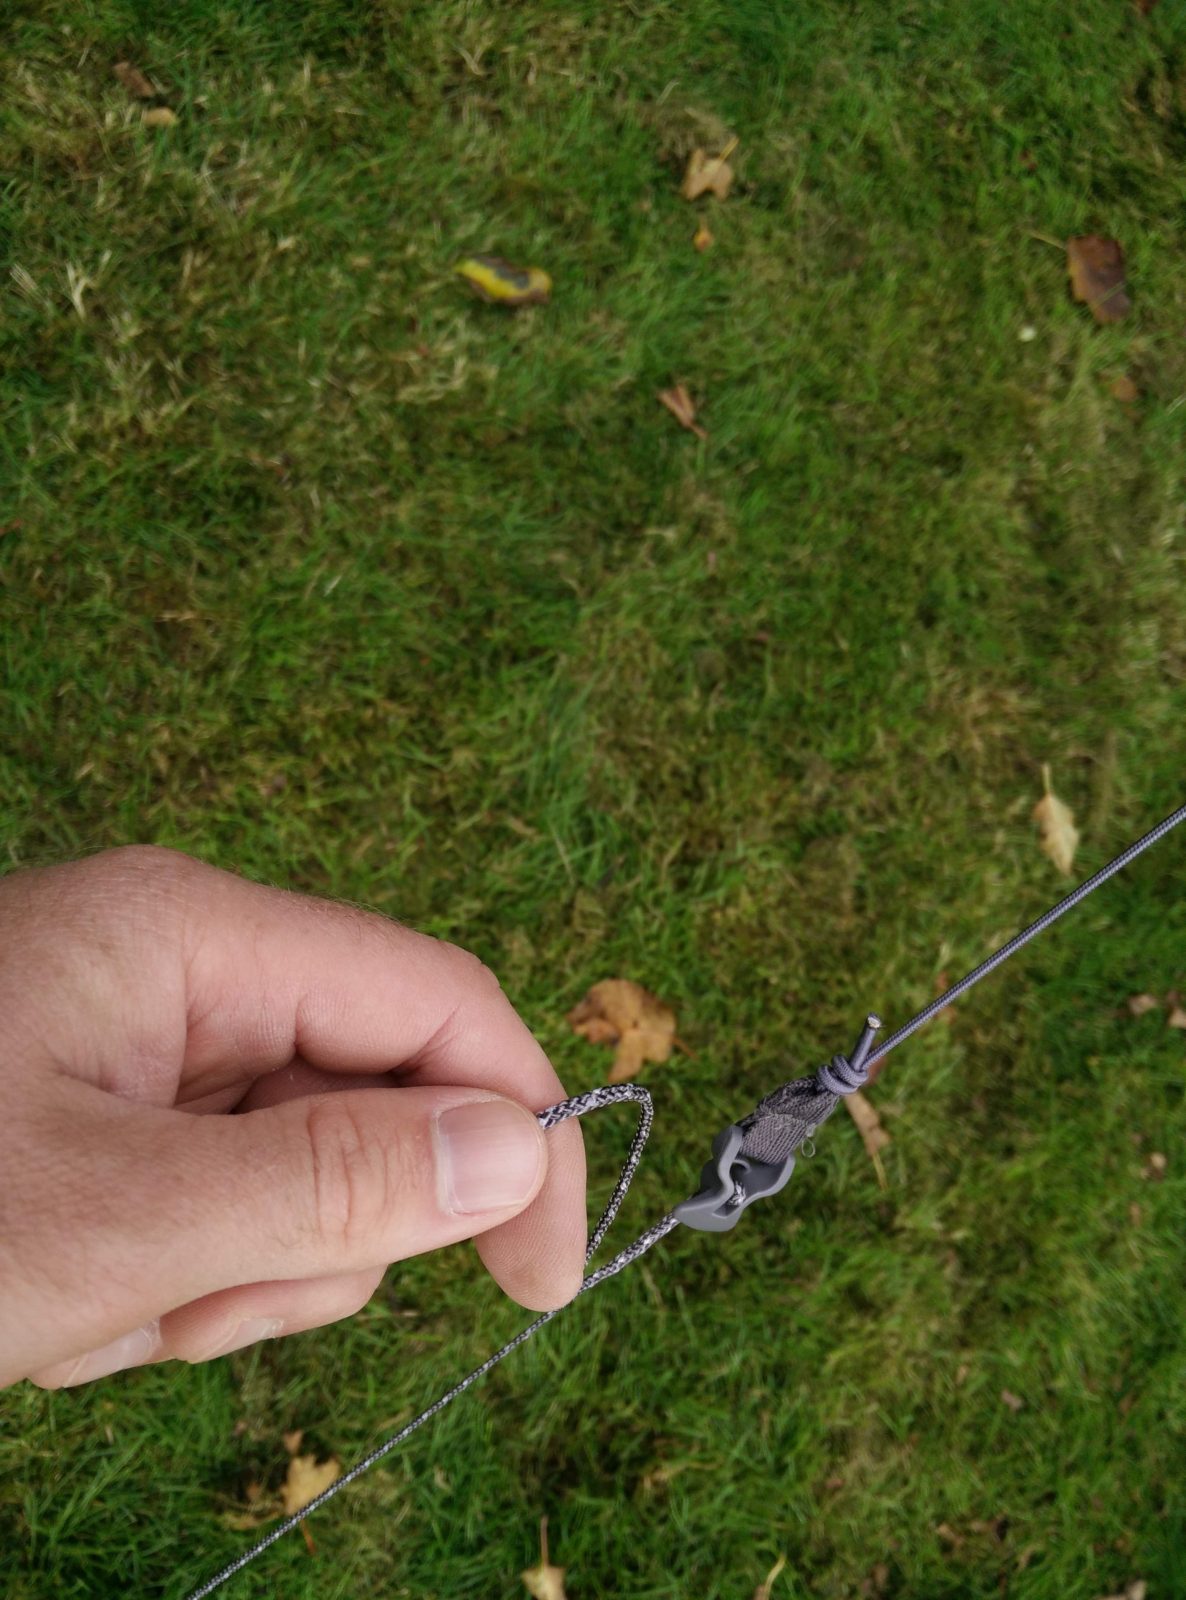
Unpack the rainfly and locate the two cords in each end. Wrap them around the tree trunks approximately 5 centimeters (2 in.) above the Python straps and secure them with the knotless hooks (see images). Then position the rainfly over the hammock by shortening/lengthening the cords with the fastening mechanism on each cord.
Use the four stakes to secure the four corners of the fly. If you have two extra stakes you can also secure the fly in the middle. All cords are equipped with a mechanism for adjusting the length and therefore it is a piece of cake to get the positioning right.
Step 3: Make the hammock tent more spacious
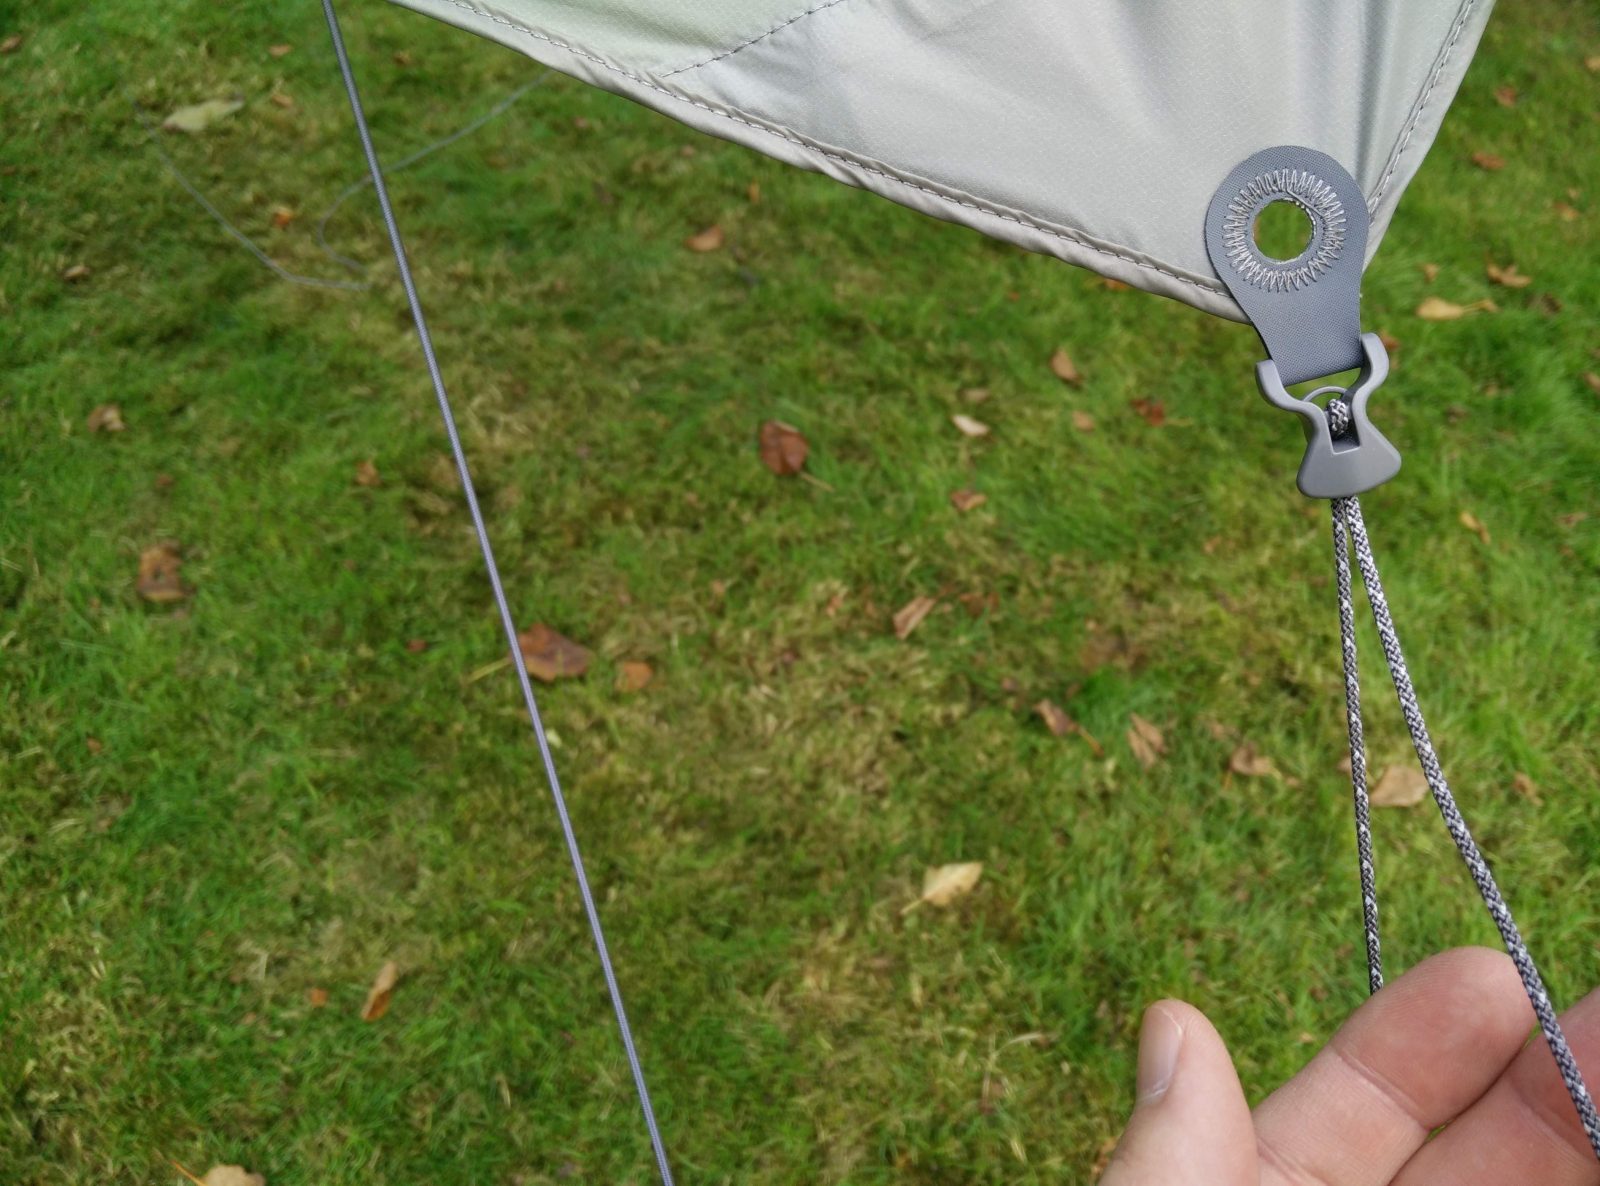
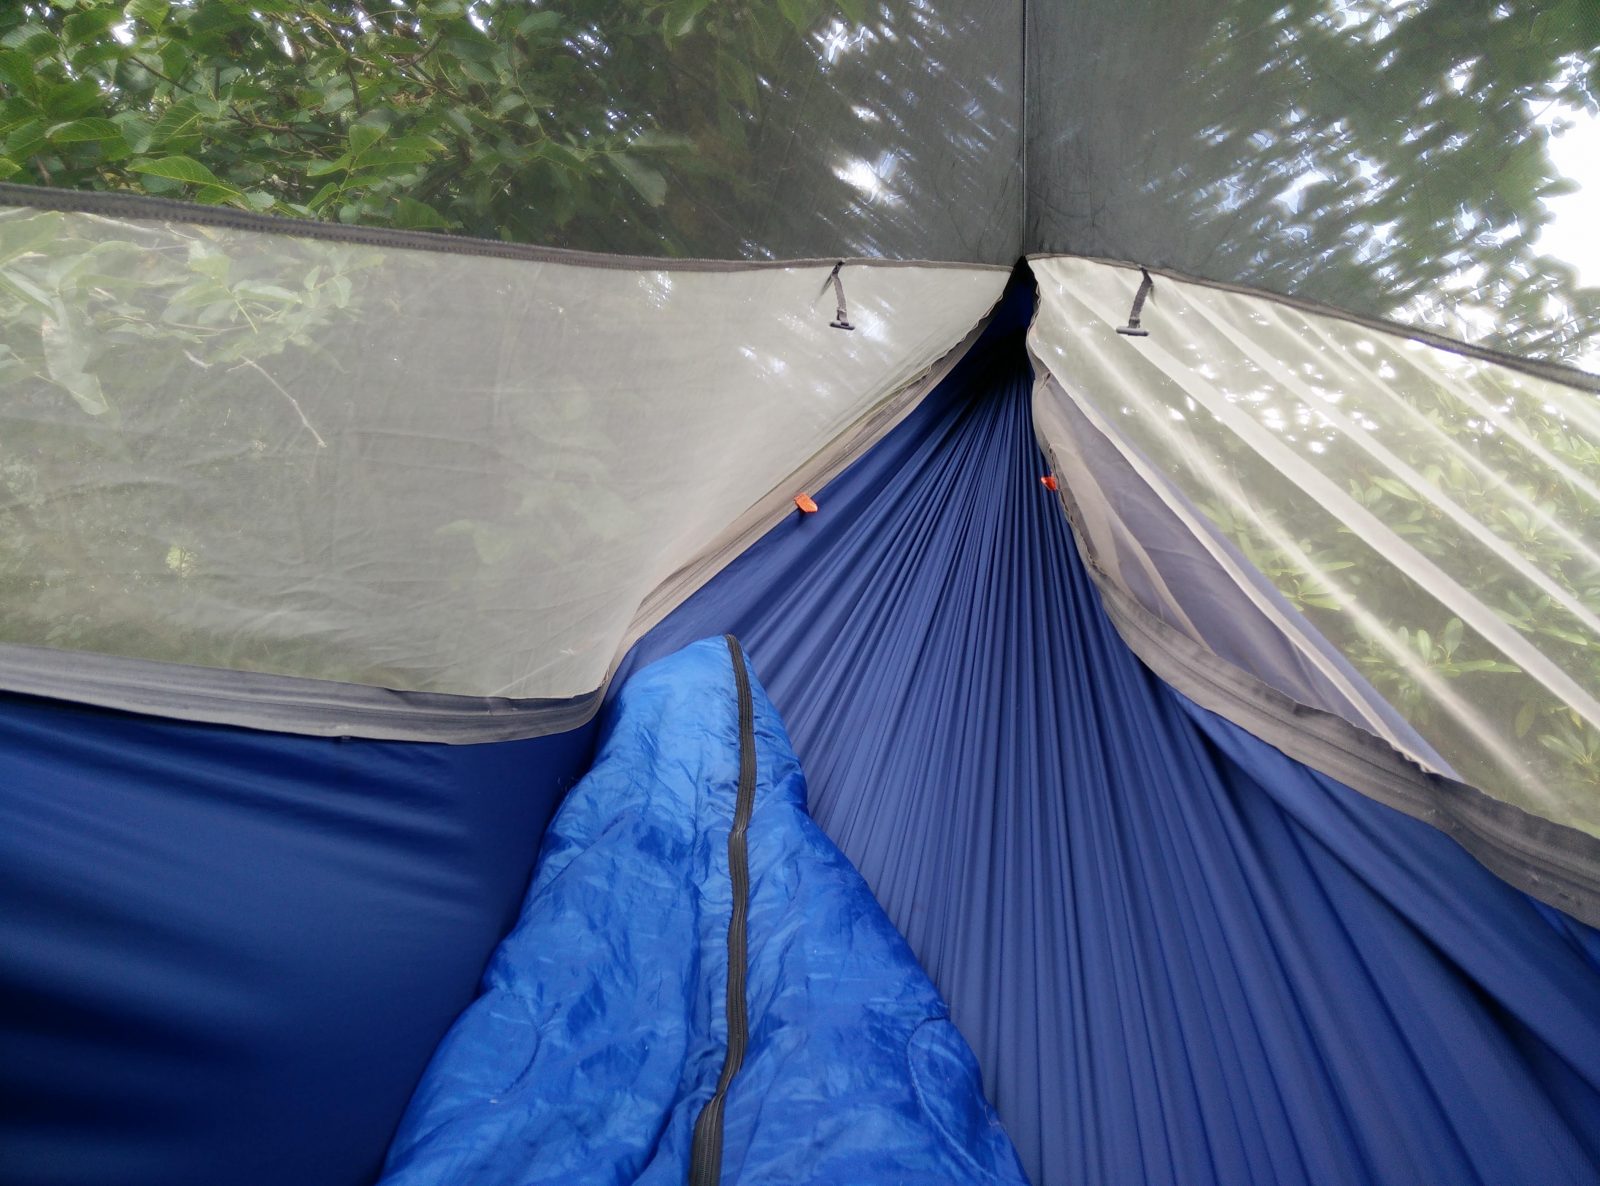
There are also several loops on the hammock tent itself and thus you can make it more spacious by connecting them to rainfly’s stakes with cords. I got three extra cords in the package and I typically used two of them in the head area and one in the legs area to widen the hammock space. These cords also have a mechanism for adjusting the length but are made of a stretchy material so you can still swing in the hammock.
Kammok Mantis Hammock Tent – Wrap the Python straps around the trees
Kammok Mantis Hammock Tent – Attach the carabiners on the hammock to Python straps
Kammok Mantis Hammock Tent – Wrap the two main rainfly cords around the trees
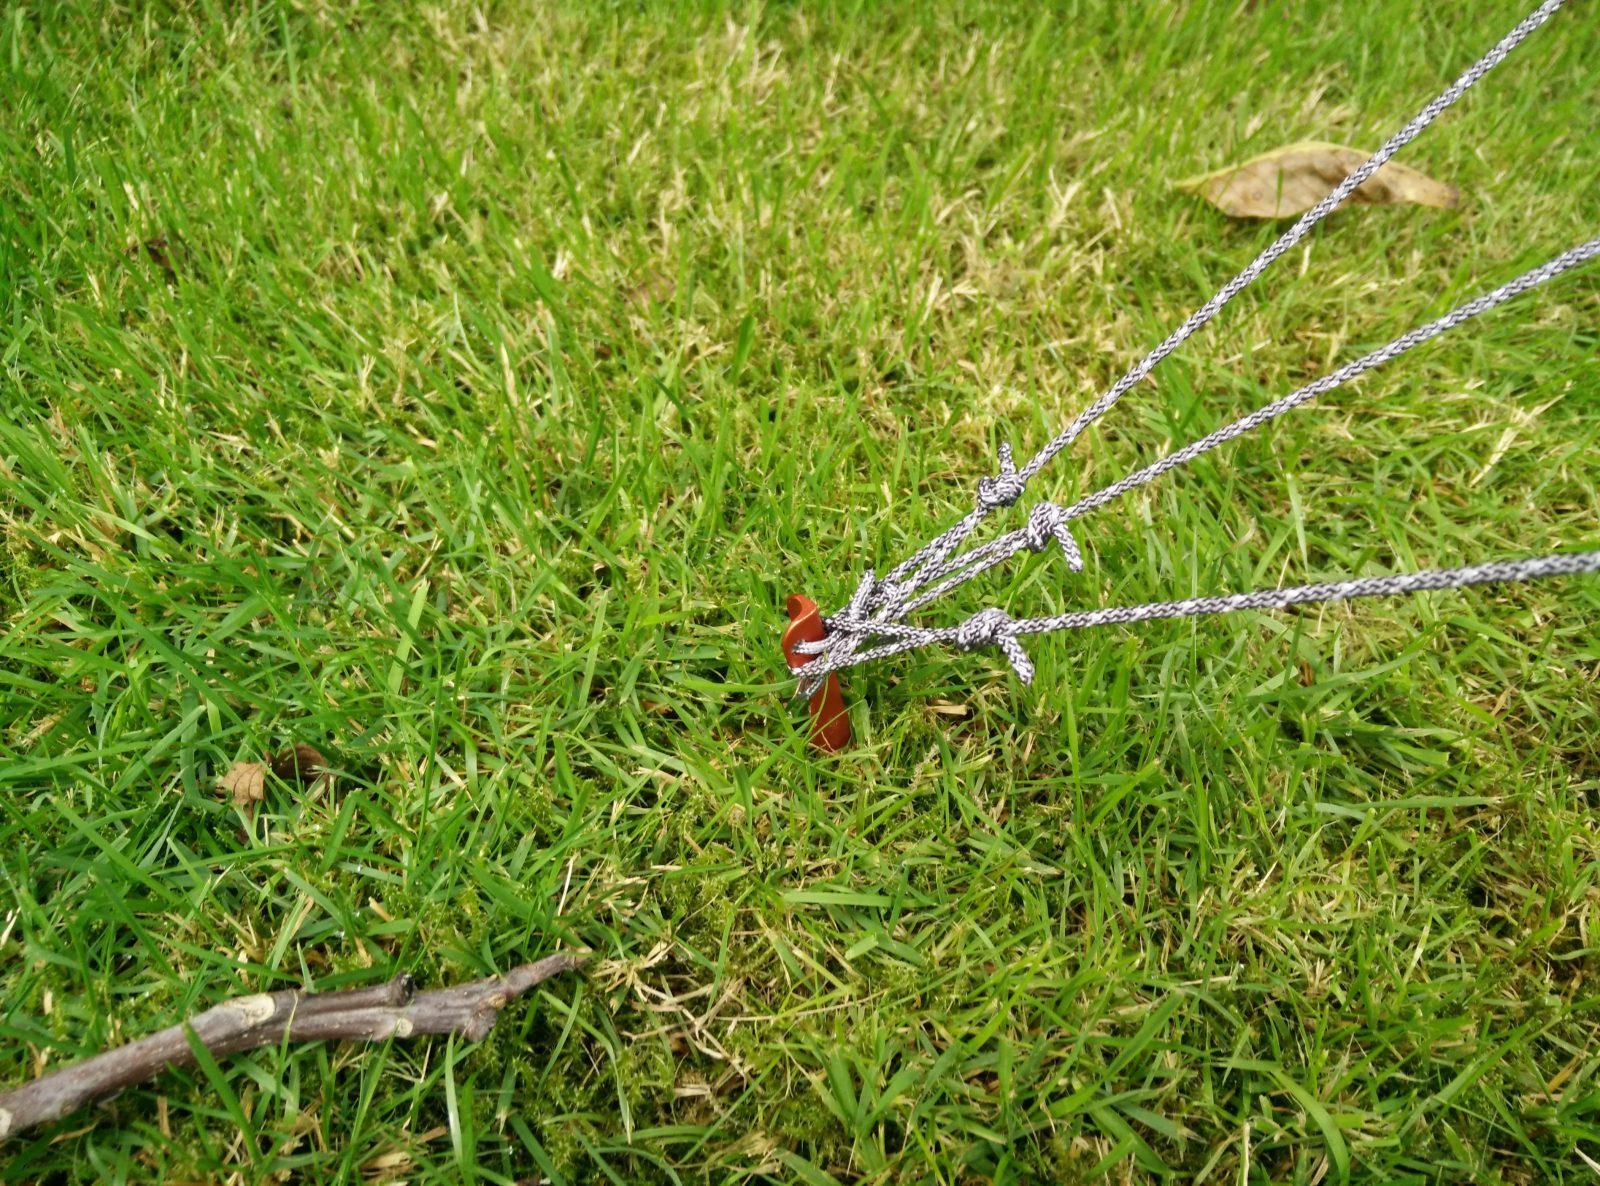
Kammok Mantis Hammock Tent – Secure the rainfly with stakes
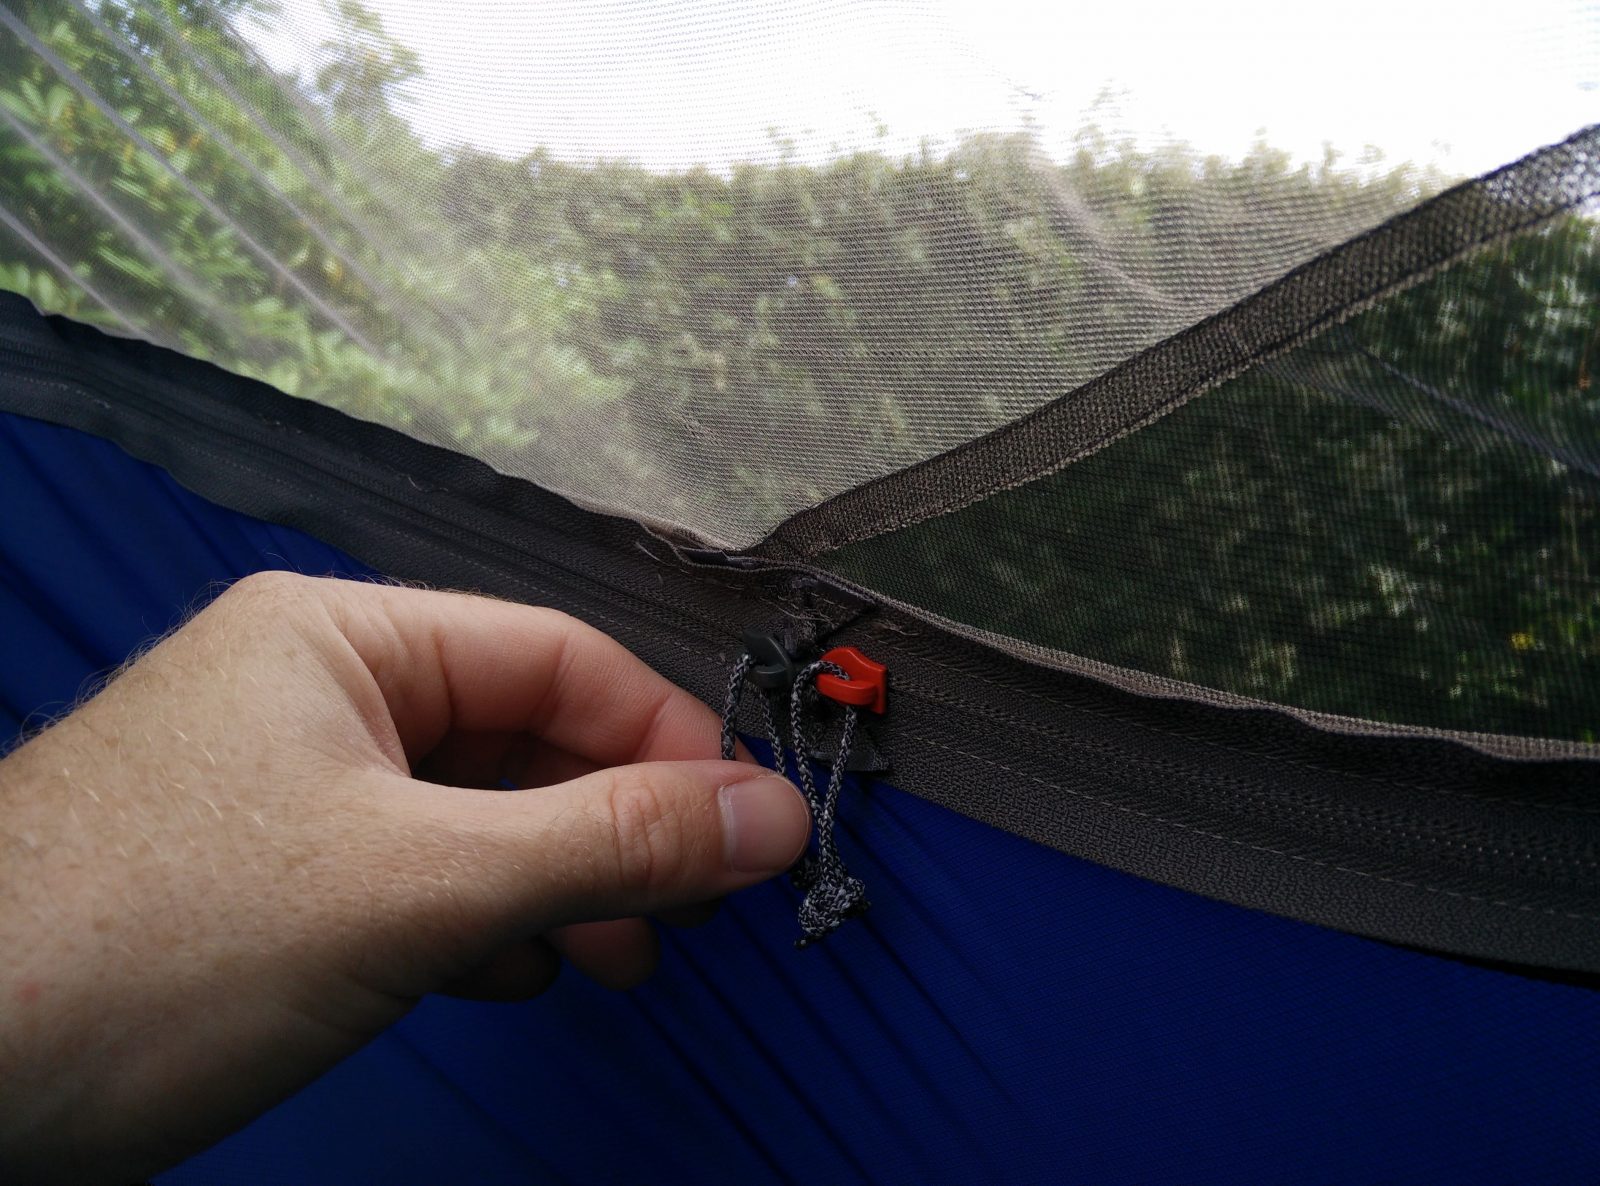
Kammok Mantis Hammock Tent – All cords feature such fastening mechanism which is really easy to use
Lengthen or shorten the cords

Make the hammock tent more roomy
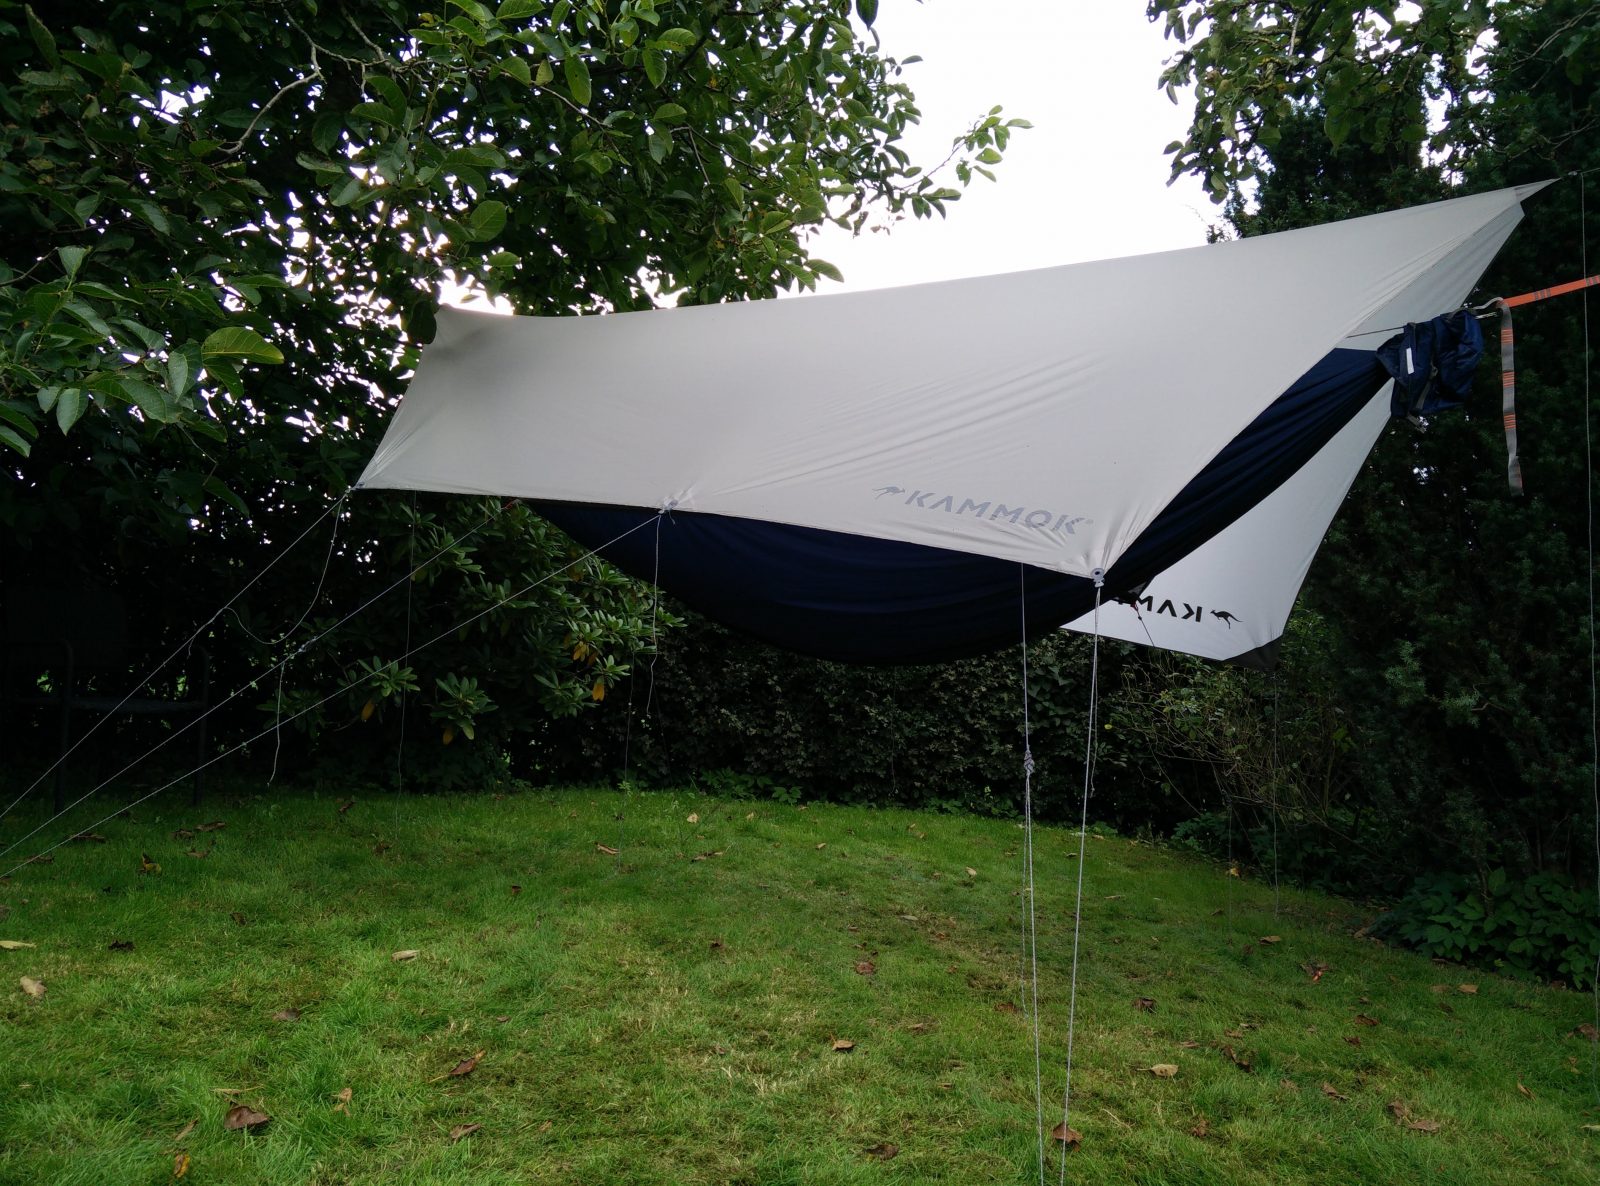
All done
Sleeping Comfort
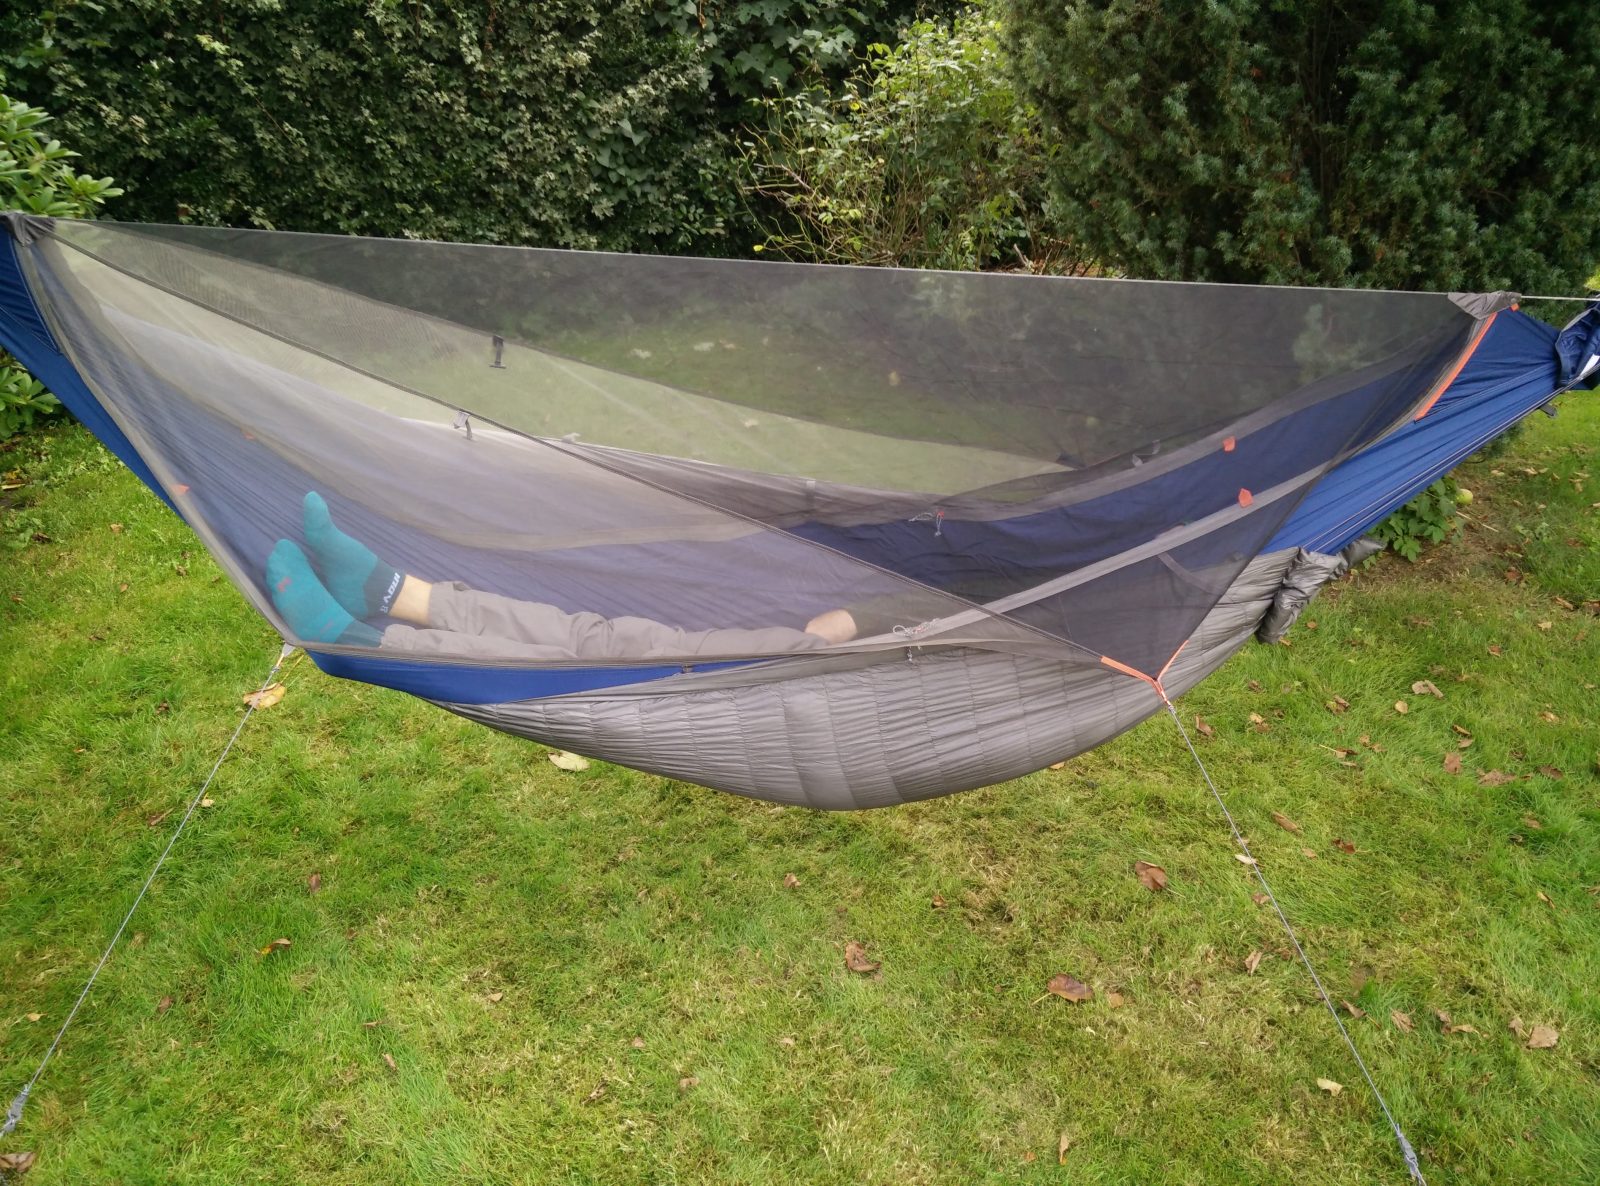
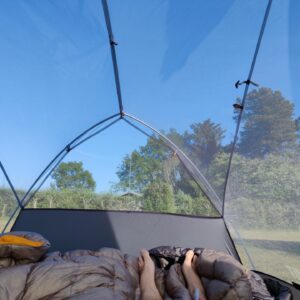
Because I had never slept in a hammock before, I was a bit sceptic about the sleeping comfort. Nevertheless, when I hopped into the Mantis, I was pleasantly surprised over the comfort and the more time I spent in it, the more I liked it. I found out that hammocks are much more comfortable than they seem. You can easily sleep on the side and if you place yourself diagonally, you can have almost a flat sleeping position. Sleeping on the stomach is, however, not an option but this was not really a problem for me.
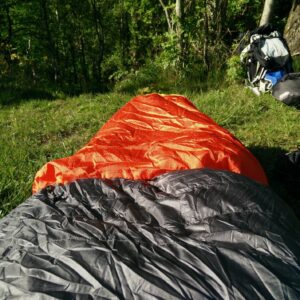
Now, the first time I used the Mantis hammock tent the temperature was around 11° C (51° F) and I slept in a sleeping bag while having the Kammok Firebelly quilt as a backup. I quickly got cold on the underside and tucking the quilt beneath me inside the hammock didn’t really help. The thing is that the insulation on the underside got squeezed up against the hammock material by my weight, and squeezed insulation doesn’t provide warmth. In a hammock the insulation gets more squeezed than on a sleeping pad because sleeping pads usually have a ribbed design while a hammock follows the lines of your body completely.
Nevertheless, there is a simple solution for this problem, using the Kammok Firebelly as an underquilt. An underquilt hangs snugly bellow the hammock and provides warmth because the insulation is not squeezed flat against anything. The Kammok Firebelly quilt is indeed designed to be used with the Mantis hammock tent and can be easily attached. You simply clip it into the carabiners that connect the hammock with the Python straps. After I started sleeping with the Kammok Firebelly quilt attached under the hammock rather than tucked inside it, I haven’t had any problems with cold spots.
I think that an underquilt is a must for temperatures below 15° C (59° F) but of course this also depends on the quality of your sleeping bag or whatever you will use for insulation inside the hammock tent.
Kammok Mantis Hammock Tent – Underquilt is a must at low temperatures
Kammok Mantis Hammock Tent – It’s quite roomy
Kammok Mantis Hammock Tent – The doors
Verdict
The Kammok Mantis hammock tent positively surprised me, and I can’t wait to use it on longer backpacking trips. It’s lightweight, modular and very durable. The setup process is also incredibly simple, so you have nothing to fear, even if you weren’t a scout. I was also satisfied with the sleeping comfort. The hammock tent is roomy, and the sleeping position is almost flat. The only thing that bothered me was the size of loops on the Python straps. If they were a bit smaller, it would be easier to elevate the hammock gradually. This is a smaller complaint, nevertheless. So, if you want to swap your tent and sleeping mat for a hammock tent, I do highly recommend the Kammok Mantis.
If you have any questions about this product, drop me a line in the comments below.
Performance Score
The Advantages
- Very lightweight complete hammock shelter system for backpacking
- Modular design allows unnecessary components to be left at home
- Simple knotless setup is beginner-friendly and fast to learn
- Integrated stuff sack reduces the risk of losing components
- Durable yet lightweight materials feel premium and robust
- Python straps allow quick and flexible height adjustment
- Detachable bug net increases versatility in bug-free environments
- Comfortable sleeping position with surprisingly spacious interior feel
- Rainfly provides reliable protection against rain and wind
- Excellent compatibility with underquilts for colder weather camping
The Considerations
- Requires an underquilt or additional insulation in cooler temperatures
- Python strap loops could be smaller for more precise height adjustments
- Sleeping on the stomach is not practical in the hammock
- Requires suitable tree spacing for optimal setup
- Several cords and components can feel slightly complicated initially for first-time hammock users
Weight
1250 g / 2 lb 12 oz
Capacity
1-person hammock tent
Required Setup
2 trees spaced 4-5.5 meters apart
Fabric
40D nylon hammock with 15D silicone-coated rainfly
Maximum Load
225 kg / 500 lbs
Sleeping System
Requires underquilt or sleeping bag insulation in cooler conditions
Best For
Backpacking, hammock camping, hiking, forest adventures


I just got a Mantis! The Firebelly underquilts are all out of stock so I am using some moving blankets and a Klymit V pad. This hammock is fantastic! Good review!